Quantcast
Channel: macro News, Reviews, and Information | PetaPixel
Viewing all 326 articles
Browse latest View live

Vincent Brady Pulled Out All the Stops to Create This Magical Firefly Time-Lapse

$
0
0

Firefly photography isn’t a novel concept. In fact, long-exposure images of these glowing creatures lighting up beautiful forest scenes have appeared on PetaPixel a couple of times before… we’ve even featured a tutorial on the subject. But photographer Vincent Brady‘s firefly time-lapse above IS novel.

It’s novel, not because it’s a time-lapse of fireflies (we’re sure that’s been done a time or two) but because he combined many different photographic techniques to create something truly breathtaking.

Here’s how he describes it on his website:

Shot primarily over the Summer of 2013 at Lake of the Ozarks, Missouri and around my hometown of Grand Ledge, Michigan. I used every trick I have up my sleeve to pull this off. Image stacking, 360 degree startrail panoramas, and even a macro love scene! Hold on to your seats these fireflies fly by pretty quick!

And here are a few screenshots to whet your appetite in case you haven’t given in to temptation and clicked play yet:

firefly1

firefly2

firefly3

The video really does defy proper description, in large part due to the complexity of some of the shots featured. So rather than sit here and try to explain what you’re about to look at, we’ll just tell you to go… you know… look at it.

And once you do, be sure to head over to Brady’s website to read more about the project from the photographer himself.

(via Sploid)


17 of the Greatest Camera Hacks of All Time

$
0
0

bigshotex1

We recently took a look at some of the best camera hacks that will save you tons of money. Today we’ve decided to turn things up a notch and progress to the next level! If you’re the kind of person who loves to take things apart to find out how they work, you’ll love the ingenious camera hacks below.

1. Repurpose an old digital camera for macro photography

If you have an old camera you think is only good for the rubbish tip, don’t be too hasty — there’s still life you can squeeze out of your camera yet. This video made by an engineering student, shows you how you can turn your old, dated camera into a fantastic bit of kit for macro photography, without the expensive of buying a pricey new macro lens:

Source: Instructables

2. Create your own DIY webcam

camerahack1

Many computers already have a built in camera, but if yours doesn’t, you can easily create one yourself! If you have an old digital camera that has video capture and video output capability, a computer with video input, and an adjustable grip tripod (which are available to buy at around £20), you’ll easily be able to make your own webcam without breaking a sweat.

Via: Digital Trends

3. Build your own infrared camera

camerahack2

In this post, Pieter Albertyn goes into great detail about how to create an infrared camera from your old point-and-shoot digital camera. It can get quite fiddly, so be prepared to set aside a couple of hours for this hack!

Source: PictureCorrect Via: Digital Trends

4. Create your own (affordable) thermal imaging camera

camerahack3

If you’ve ever considered buying a thermal imaging camera, but you don’t own one, there’s probably a reason why not. They’re incredibly expensive. But fret not as buying one isn’t your only option if you have your heart set on owning one — you can make your own, and the kit you’ll need to make one is much more affordable!

Max Justicz is the genius behind creating the DIY thermal imaging camera. With some RGB LED flashlights, an infrared thermometer, and some patience, you too could be light painting with temperature. Read Max’s guide to making the kit.

Source: Max Justicz Via: Hack a Day

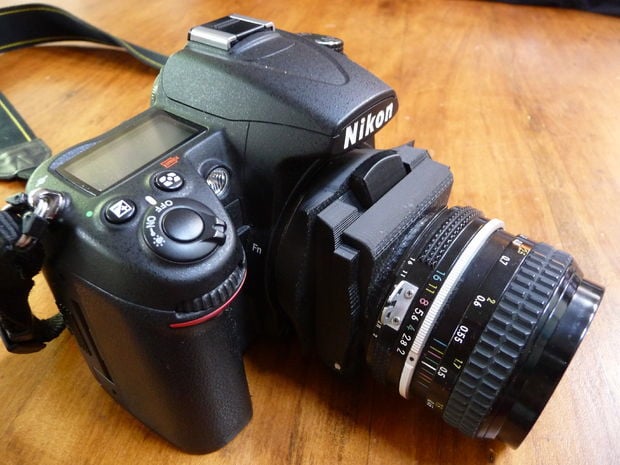
5. Give an old lens a new lease of life

camerahack4

We love this camera hack by photographer and film maker Jason Bognacki, which gives a new lease of life to beautiful old camera gear. In this case, Jason combined his 1919 Piccolette Contessa-Nettel folding camera with his Canon 5D for some stunning results. He says, “It truly is a magical thing to hold something so old in your hand and see it come back to life and produce images again.”

Read the story here or visit his blog, Today’s Tomorrow.

Source: Today’s Tomorrow Via: Digital Trends

6. Lumix G1 working with an ancient lens

camerahack5

camerahack5.1

Jason isn’t the only person to have a passion for bringing old cameras and lenses back to life. Yuji Takahasi attached an old lens from the early 1900s to his Lumix G1 using leather and velcro among a couple of other materials. And voila! Here are the results.

Source: DIY Photography

7. Stunning aerial photography using drones

camerahack6

Aerial photography could well be the next big trend in photography. Photographer Eric Cheng has done some extensive work and testing with quadcopters and cameras in order to try and capture the best results from his aerial photography. You can see all about his work on his new website Skypixel, and you can also take a look at photographs from his entire build process on Google Plus.

Source: PhotoShelter

8. Aerial shots using a hacked Lumix GH2 and hexacopter

Continuing on the subject of aerial photography, this video — called ‘Firefly’ — was filmed using a hacked Lumix GH2, Tokina 11-16mm f/2.8 and Sigma 30mm f/1.4 lenses, and a hexacopter from jamcompters.com. Amazing results!

Source: Vimeo Via: no film school

9. Lytro hack turns any DSLR into a lightfield camera

camerahack7

We’re all very excited about the capabilities of the Lytro camera, which allows you to refocus images after you’ve taken them. This hack uses Lytro’s amazing technology on any normal video capable DSLR camera to create a similar effect. This post explains how this is possible, and what you’ll need to do to achieve the Lytro effect on your own DSLR.

Source: TechHive

10. DIY point-and-shoot made from 3D printer and parts from RadioShack

camerahack8

This post shows you how to make a point-and-shoot camera using a 3D printer and parts from RadioShack. You can even download a template to print the body, using RadioShack’s JPEG Colour Camera Board to go inside it. This post shows you how.

Source: Instructables Via: CNET Via: PetaPixel

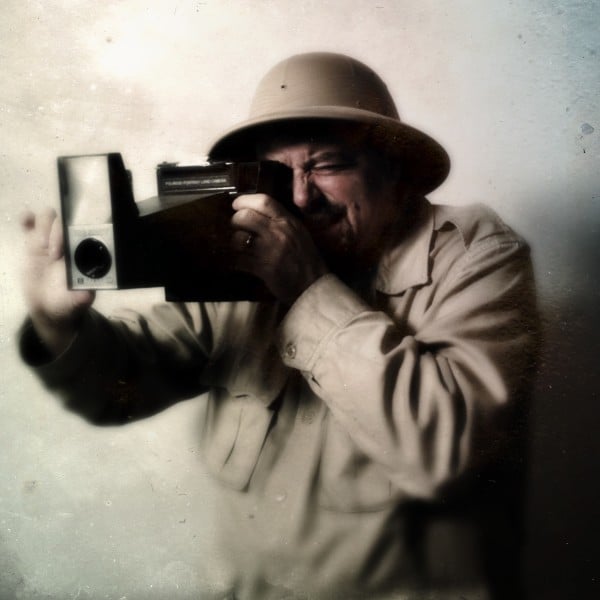
11. Hacking a Polaroid BIG SHOT

camerahack9

The Polaroid BIG SHOT is a piece of kit used by Andy Warhol in the 1970s to photograph celebrities. Photographer Giovanni Savino was sold on using the BIG SHOT himself, but doing so presented him with a number of difficulties, including film and flash limitations.

Giovanni didn’t let these issues, or the fact that Polaroid had gone out of business, put him off. Instead he resourcefully gave his BIG SHOT a new life, enabling him to achieve the incredible shots we was looking to capture. Here’s how he did it.

Source: PetaPixel

12. Focus stacking macro photos with a hacked flatbed scanner

camerahack10

The effects of focus stacking images can be incredible as it allows for a much greater depth of field than would otherwise be possible. It is a tricky process however, and often difficult to control using the zoom ring on your lens.

Looking for a solution, photographer and software engineer David Hunt decided to turn a flatbed scanner into a macro rail for his camera when shooting focus stacked photos. It’s actually not as difficult to do as you might think! He explains the process on his website.

Source: David Hunt Photography Via PetaPixel

13. Shooting space with two hacked cameras and a balloon

If you’re feeling really ambitious, you could always try a hack that would enable you to shoot from space. That’s, incredibly, what Colin Rich did using homemade weather balloons. This video reveals what work went into sending his cameras 125,000 feet to the edge of the Earth:

Source: Vimeo Via: PetaPixel

14. DSLR turned into a monochrome camera

OLYMPUS DIGITAL CAMERA

Always wanted a monochrome camera? No problem! Follow Lasse Beyer’s instructions into how to achieve just this. It might be simpler than you think!

Source: preamp Via: PetaPixel

15. Homemade autochrome camera

camerahack12

If building a camera from scratch was something you always wanted to do, you could mimic what photographer Dominique Vankan did and build a large format camera from LEGO, cardboard, and duct tape. He was trying to mimic the effects of the old Autochrome Lumiere process from the early 1900s, and the result wasn’t too far off!

Source: The Autochrome Project on Flickr Via: Digital Camera World

16. Motorised time-lapse slider

camerahack13

Have you longingly watched time-lapse films of stars swirling around the sky and clouds tumbling over mountains and dreamed of creating something similar yourself? Why not build yourself a motorised slider, so you’ll be able to shoot stunning time-lapse films that look like they’d be good enough for the BBC, without breaking the bank!

Source: Digital Camera World

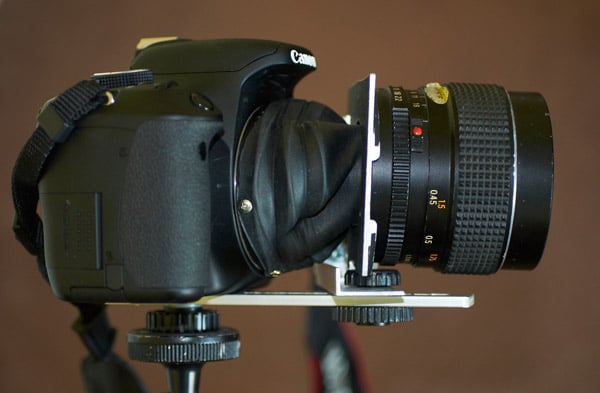
17. Make a tilt-shift lens from an ordinary optic

camerahack14

There’s no denying that tilt-shift lenses are expensive, but the results they can deliver can leave us drooling. Is it really possible to achieve the results of a tilt-shift lens without the lens itself? Of course it is! Chris Rutter explains how he created his own DIY version of a tilt-shift lens at just a fraction of the price. Read his post to find out what you’ll need, and how to construct a DIY tilt-shift lens of your own.

Source: Digital Camera World


About the author: Samantha Stocks is a writer and photography enthusiast based in Bristol, England. When not hunched over her laptop, she can be found being pulled around muddy Somerset fields by her ridiculously strong dog. Visit her website, or find her on Twitter. This article originally appeared on PhotoVenture.

3D Printed DIY Macro Adapter Makes a Tilt-Shift Lens from Any Nikon F Mount Glass

$
0
0

F7FMPVZHVXPQG3K.MEDIUM

When it comes to DIY tilt-shift, there are a few different options out there, but none of them that we’ve seen are quite as impressive and practical as this 3D printed method from Instructables user Cpt.Insano.

With the help of CAD software, Cpt.Insano has constructed an adapter that can turn almost any Nikon bayonet mount lens into a tilt-shift lens.

Granted, there is one substantial drawback: the adapter increases the lens distance from the sensor, turning it into a macro lens. But it’s still an impressive design that allows you to get more out of a lens you might not otherwise be using.

STLFilesMacro

If you happen to have a 3D printer lying around, you can actually get this printed and built yourself in no time thanks to the .stl design files Cpt.Insano shared through the tutorial. Once printed, all it takes is a bit of sanding the plastic and some minor assembly and you’re good to go.

For those of you who don’t have a 3D printer on hand, there are still options available. A number of on-demand 3D Printing companies, such as 3D Rapid Print, could handle the job no problem. Just upload the CAD files, insert your information, and after a bit of a wait you’ll have yourself a comparatively cheap macro tilt-shift adapter.

Below are a few resulting photographs from the setup.

FTVS42JHVXPQG0U.MEDIUM

FHJB87THVXPQFZ2.MEDIUM

To get those files or read the full step-by-step tutorial, head over to Instructables by following the link below. And if you do attempt this, upload some of your test shots in the comments! We’d love to see how this turned out for you.

3D Printed Tilt-Shift Macro Extension Tube [Instructables via DIY Photography]

Beautiful Macro Photo of a Hummingbird’s Details

$
0
0

Green-Crowned Brilliant Heliodoxa jacula

In the world of macro photography, the speedy hummingbird isn’t the easiest subject. With a little patience, however, you could nail a shot that reveals details you normally can’t see when tracking the bird with your eye.

That’s what photographer Chris Morgan was able to do on a recent vacation in Bosque De Paz, Costa Rica (a 3,000 acre biological reserve).

After being tempted by the birds “to the point of madness,” Morgan slowed things down, got close, and snagged the gorgeous close-up above of a Green-Crowned Brilliant hummingbird posing for a portrait.

Here’s one way to tell if you’ve nailed a macro of a hummingbird: you can see yourself pretty clearly in the bird’s eye.

Green-Crowned Brilliant Heliodoxa jacula

Green-Crowned Brilliant Heliodoxa jacula

Here are a couple of other photos Morgan captured on the same holiday:

Green Violetear - Colibri thalassinus

humming3

Although hummingbirds were plentiful on the reserve, capturing these photographs is quite tricky — in a single hour-long shoot, Morgan snapped nearly a thousand photographs before he landed a few usable images showing the hummingbirds clearly.

Another challenge? The iridescence — it’s so angle specific, that if the bird turns a tiny bit to the left or to the right, the beautiful colors on its plumage can disappear completely.

You can find more of Morgan’s bird photographs over on his Flickr account, and a larger version of the top macro can be found here.

(via Colossal)


Image credits: Photographs by Chris Morgan and used with permission

These Focus Stacking Walkthroughs Will Help You Take Your Macro Photography to the Next Level

$
0
0

When it comes to macro photography, knowing how to properly focus stack your images can make a massive difference. To that end, the walkthrough above and Photoshop tutorial below offer a fantastic explanation of what focus stacking is, why and when you should be using it, and how to do it using software most of us already have installed and ready to go.

Focus stacking, for those who don’t know, is the combining of several images (sometimes tens of images) shot at different focus distances so that the entire image is in focus. This is particularly important for macro photography because the close you get to a subject the shallower your depth of field gets.

By combining images where the focus point is slowly changed, you end up with a final composite that is 100% sharp and in focus.

So these (plus 4 more):

focusstack3

Become this:

focusstack1

“But why would I do this?” you may ask. Why not just stop down the lens all the way? For one, that might not actually give you enough of the image in focus depending on how small your subject is and how close you are to it; plus, you’ll need to up your shutter speed or bring in serious flash power to compensate and that might not be an option.

And then there are quality issues, because most lenses perform best at an aperture between f/5.6 and f/8. Shooting all the way closed down can kill sharpness even as it brings the entire image in focus, simultaneously causing aberrations and other issues.

Using focus stacking, you can take multiple pictures at your lens’ ideal aperture and end up with a tack-sharp shot like this one:

This is a focus stack made up of 19 separate images

This is a focus stack made up of 19 separate images

So… how do you do this? The best option is to use a dedicated focus stacking program as the video at the top shows, but if you don’t have access to one or don’t want to pony up the cash just yet, the tutorial below will show you how to do it in Photoshop:

Nailing down this technique is crucial if you’re going to take your macro photography to the next level. So check out the videos and examples above and, if you have further tips, feel free to drop them in the comments down below! Happy snapping.

(via Reddit, H/T SpookyRED)


Image credits: Focus stacking Tachinid fly by Muhammad Mahdi Karim and Laboulbeniales on Harmonia axyridis by Gilles San Martin

Video: Comprehensive Introduction to Macro Photography

$
0
0

Landscape photographer Tim Cooper is a name we just recently shared with you. Today, we’re sharing his work with you again, this time in the form of a presentation he shared at a B&H event earlier this year. In it, he gives a detailed look at the world of macro photography.

The presentation is a whopping hour-and-forty-five minutes long. In it, Cooper speaks through an incredible amount of detail in both information and tips. From the basics, such as what the equipment best suited for macro photography, to the more complicated aspects such as planes of focus and magnification ratios.

Screen Shot 2014-07-27 at 2.30.28 PM

Information like this doesn’t often come free, so toss this video in your queue and take notes. For more, you can head on over to Cooper’s website, as well as B&H’s YouTube Channel.

(via Picture Correct)

These Spider Fangs Aren’t Going to Photograph Themselves

$
0
0

Atrax robustus

Here is a photograph of a Sydney funnel-web spider, Atrax robustus.

I won’t explain the biology of this delightful animal here – you may read about it at Wikipedia in greater arachnological detail. Instead, I want to show the process by which I arrived at this composition. Most photographs involve some combination of creativity and constraint, and this one was no different.

Venom researcher David Wilson collects a droplet from a male funnel-web spider at James Cook University in Queensland, Australia.

Venom researcher David Wilson collects a droplet from a male funnel-web spider at James Cook University in Queensland, Australia.

Last month I spent a couple hours in Dr. David Wilson’s venom chemistry laboratory in Cairns, Queensland, with the opportunity to photograph a few of his study animals. With a tight schedule and several species to shoot, an elaborate session for any particular spider was out of the question. The goal, rather, was to create a dramatic, usable image in a few minutes’ time with one spider still in his cage.

Dr. Wilson coaxed one of the animals, a male A. robustus, part-way from its burrow, poking it to induce a standard threat display. The spider would then sit motionless for several minutes thereafter, fangs bared and legs raised. As someone used to frenetic ants, a sedentary spider was magic! The animal just posed, still as marble.

I put Canon’s 100mm macro lens on my camera, arranged two diffuse off-camera strobes for lighting, and started with a simple shot.

fangs3

I thought the result was ok. In focus, at least. But not great. The extra silk at the bottom and in the background was distracting, and I wanted more spider. (How could you not want More Spider?!) So I moved closer:

fangs4

Better!

But the background plastic remained distracting and ugly. I couldn’t remove the spider and have him retain this winning pose, so I instead took advantage of the translucence of the container. I moved one of the strobes behind the enclosure to overexpose the plastic to a pleasing white, and we teased the spider an extra half inch higher to clear it of some other schmutz. The new backlit background was better still:

fangs5

Almost there! But I still wasn’t satisfied. The center of interest in this subject is the fearsome fangs, and in this capture their lines were not symmetrical, the one on the right didn’t stick out as far as its counterpart. So we rotated the container for the winning exposure:

fangs6

Later, across the ocean and back at home, I applied a few digital tweaks to the levels for the final image:

A male Sydney funnel-web spider in threat display. Laboratory Animal at James Cook University in Queensland, Australia.

A male Sydney funnel-web spider in threat display. Laboratory Animal at James Cook University in Queensland, Australia.

I have no idea how I would have done this back in the film era.


About the author: Alex Wild is an entomologist based out of Illinois who specializes in the evolutionary history of ants. In 2003 he founded a photography business as an aesthetic complement to his scientific work, and his natural history photographs appear in numerous museums, books, and media outlets. You can find more of his work on his website or by following him on Twitter. This article originally appeared here.

Stunning Photographs of Rain Drop-Covered Flowers After a Storm

$
0
0

wed_6

Digital media designer and, for at least the last two years, photographer Bettina Güber recently shot a series of photographs that are stunning in their simplicity. Not overdone or over-processed, they’re simply photos of flowers and leaves from her backyard, covered in rain drops from the storm that recently passed through.

Speaking with Güber, she tells us the photos in the appropriately titled “Wednesday Evening” series just sort of happened:

I actually shot this series on a Wednesday Evening after the rain stopped. There was beautiful light and the raindrops shimmered… a wonderful atmosphere and perfect conditions for a photographer.

It was that shimmer she set out to capture:

wed_3

wed_1

wed_2

wed_4

wed_5

wed_7

wed_9

wed_10

wed_11

wed_8

wed_12

Captured in her own backyard with a Nikon D7000 and an AFS Micro NIKKOR 40mm f/2.8G lens, Güber tells us the photos came out very close to this in-camera. All she added in post was “a little Photoshop to darken the background a little bit more.”

To see more of Güber’s photography, or follow her as she continues to take pictures of everything from insects, to miniature figurines, to vintage cameras, head over to her Behance profile by clicking here.

(via InspireFirst)


Image credits: Photographs by Bettina Güber and used with permission


Spellbinding Macro Photos of Fish and Reptile Eyes… and an Owlet

$
0
0
Porcupine puffer fish

Porcupine puffer fish

Photographer Suren Manvelyan is back with more of the types of images that he’s made his name capturing. Namely: intense macro photographs of the strange shapes and landscapes found in animals’ eyes.

In 2011 we shared part one, in 2013 part two, and now we get to share part three: a fishy exploration into the eyes of animals that spend much or all of their time underwater… and an owlet.

There’s not much to say about his photos that we’ve not said before. The images are striking and spellbinding, drawing you in to explore every crack, crevice and chink in the colorful eyes of everything from the weedy scorpionfish to the porcupine puffer fish.

See for yourself below:

Catfish

Catfish

Red lionfish

Red lionfish

Eschmeyer's scorpionfish

Eschmeyer’s scorpionfish

Thornback-ray fish

Thornback-ray fish

Gurnard fish

Gurnard fish

Weedy scorpionfish

Weedy scorpionfish

Rockfish

Rockfish

Morey fish

Morey fish

Blackspotted puffer

Blackspotted puffer

Lobster

Lobster

Broomtail-wrasse fish

Broomtail-wrasse fish

Piranha

Piranha

Octopus

Octopus

Cambala

Cambala

Nylus crocodile

Nylus crocodile

Viper

Viper

Garden boa

Garden boa

Owlet

Owlet

You can keep up with Suren’s photography by heading over to his website or following him on Behance. And if you’d like to play “guess the owner” with his eye photography, don’t forget to follow him on Facebook as well.

(via Sploid)


Image credits: Photographs by Suren Manvelyan and used in accordance with Creative Commons license.

DIY: Noticeably Improve Your Macro Photography with a Cheap Plastic Cup

$
0
0

cup1

Hand-held macro photography presents a lot of challenges, but three of the most prevalent are: subject movement, camera shake, and harsh shadows. Fortunately, you don’t have to carry around a bunch of gear to solve these issues. In fact, a cheap plastic cup will do the trick all by itself!

In a fantastic tip shared over on Lynda, photographer Joseph Linaschke explains how a cheap, frosted plastic cup solved each of these three issues for him.

First, the setup. You’ll need some plastic cups, scissors, your camera, and (optional) some gaffer’s tape:

cup2

Once you have all that, just cut a hold in the bottom of the cup that is big enough to just barely fit over your lens. If you do a good job, says Linaschke, it’ll snap right now!

He chose to use some gaffer’s tape because the cup cracked after repeatedly snapping it onto and off of his Panasonic LUMIX 45mm f/2.8 lens, but it’s up to you whether or not you want to copy him there.

Once it’s attached, you can get to shooting. Just set the cup over your subject and snap away — all three of your problems are solved. If the subject is moving, they’re now trapped; if you’re shaking, you now have an extra point of stabilization without lugging around a tripod; and the clear cup acts as a diffuser that softens any harsh light:

cup3

Here are a few samples:

cup4

cup5

cup6

cup7

Linaschke does point out that your lens size could be a limitation. The larger the lens, the larger the cup you need, and you may need to stack cups for some added distance. But any challenges you run across should be easily overcome with a bit of ingenuity.

To read the more detailed step-by-step tutorial for yourself, head over to Lynda by following the link below. And if you want more macro photography tips and tricks, check out Linaschke’s “Photography 101: Macro and Close-up Photography” video.

Shoot Great Macro Photos — with a Cheap Plastic Cup [Lynda]


Image credits: Photographs by Joseph Linaschke and used with permission

The Beauty of Chemical Reactions Captured in Macro with a Panasonic GH4

$
0
0

Zn-Pb-Tree-01

Beautiful Chemistry is a collaborative project that strives to bring the beauty of chemistry to the masses by using macro photography to capture chemical reactions as they happen. Shot in 4K using Panasonic’s GH4, these videos and stills bring to life a wondrous world invisible to the naked eye.

In order to capture the video and accompanying stills, the Institute of Advanced Technology at the University of Science and Technology of China and Tsinghua University worked together to turn chemical reactions into beautiful images.

The team behind Beautiful Chemistry chose the GH4 for its solid performance, vast array of macro lenses and its comparatively low price point. They then paired it up with a Tokina 100mm f/2.8 macro lens shot at f/16 for a majority of the shots to maximize the DOF and ensure the best macro ratio, which hovered between 1:1 and 1:1.5.

Egg-HCl-01

Both the video and still images from the project are impressive, even if you’re only capable of viewing it at 1080p and not the native 4K.

One of the best things about shooting at 4K is that frames pulled from the footage translate into roughly 8-megapixel photographs, meaning the team was able to choose only the best possible frames to solidify as still images… this is one of those cases where we’ll definitely forgive the spray and pray:

AgNO3-NaCl-02

Zn-CuSO4-02-1024x576

Purple-cabbage-NaOH-01

Fluorescent-Chemicals-NaOH-04

CoCl2-Na2SiO3-03b

CuSO4-Crystallization-02

CuSO4-NaOH-01

AgNO3-Na2S2O3-01b

To learn more about the reactions taking place or keep up with future imagery, head over to the Beautiful Chemistry website by clicking here.

(via 4/3 Rumors)


Image credits: Photos and video by Yan Liang for The Institute Of Advanced Technology at University of Science and Technology of China and Tsinghua University Press, and used with permission

A Crazy Looking Macro Flash Adapter Darth Vader Would be Proud Of

$
0
0

macro1

What you see above is one of the most unusual pieces of lighting gear we’ve ever chanced across. Looking a bit like a prop from the upcoming Star Wars film, this contraption is actually a macro flash adapter designed by Polish photographers Agnieszka and Ernest Lysak.

The concept behind this ‘multi-channel’ flash adapter has gone through a number of iterations, with 7.0 being the largest, latest and most refined.

macro

And while the design of the devices may seem unconventional, they are pieced together in this way for a reason. The design funnels the light coming from the flash evenly across the four separate panels, each of which you can then open and close as you see fit.

Here’s a closer look at the latest version from all angles, followed by two videos. The first video is a basic run-through of one of their first concepts, while the second shows the adapter in action:

macro2

macro3

macro4

macro5

macro6

No word on pricing or availability, but if you’d like to keep up with the Lysaks and their conceptual endeavors with the macro flash adapter, head on over to their site or give them a follow on Facebook.

When we spoke with them to get permission to share the concept images, they told us a new 3D printed model is in the works, and should pop up on their website in about 2 or 3 weeks.

(via The Phoblographer)


Image credits: Photographs by Agnieszka and Ernest Lysak and used with permission

Beautiful Macro Photographs of Insects and Flower Refractions in Dew Drops

$
0
0

140409_234702_MA_R8_S41

Italian photographer Alberto Ghizzi Panizza has spent the past ten years perfecting his particular brand of macro photography. Specifically, Panizza has nailed down the niche of capturing macro photographs of flowers as refracted in minuscule drops of dew, oftentimes on insects.

Panizza’s portfolio is vast, boasting an impeccable amount of these — and other — macro photographs. For these unique macro shots, Panizza says he uses a Nikon D7100 at roughly 40mm, with most shots captured in the two second shutter range. As with most macro photography, Panizza focus-stacks the images in post to capture a more acceptable depth of field.

In speaking with the Daily Mail about his photographs, he said the most difficult aspect is finding the perfect refraction

“You have to find the perfect position with the right angulation and the perfect distance from the lens and the subject.” he told the paper. “For the drops of dew, it’s better to take pictures of the smallest ones as these are the perfect spheres.”

Below are a few of our favorite images from Panizza’s portfolio:

2014-10-20_01-37-12-MA-R8-S3

13-04-13_154133_MCfinc

13-10-03_180856_MB_R8_S4

alberto-panizza-4-670x447

131215_001711_MC

2014-09-11_08-35-21-MB-R8-S3

13-08-23_192308_MB_R8_S4

11-04-06_200354_MB_R8_S4

To see more of his Panizza’s work, head on over to his website by clicking here.


Image credits: Photographs by Alberto Ghizzi Panizza and used with permission

Fuji Unveils Two X-Series Macro Extension Tubes and a Serious Firmware Upgrade for the X-T1

$
0
0

MCEX_16_MCEX_11

Sony might be stealing the show with the announcement of the a7II today, but one other camera company released some gear today too. They’re a little Japanese outfit you might have heard of called Fujifilm, and today they unveiled two new X-Series macro extension tubes and the release date for the huge X-T1 firmware 3.0 update.

First up, the extension tubes. The MCEX-11 and MCEX-16 tubes are compatible with XF and XC lenses, and offer electronic contacts that will keep your auto exposure intact. Focusing range, however, will be limited with the tubes attached. So much so that the company felt the need to mention the need to “[move] the camera forward and backward” to find the focus point.

Fuji isn’t revealing more about the two new products than that, but both tubes will arrive on store shelves mid-December for $100.

X-T1GSE_front_top_white

The other major news is the re-announcement of firmware V3.0 for the Fuji X-T1 — re-announcement because we first heard about this update at Photokina, but now we get more details and a release date.

X-T1 users will get a plethora of new and improved features when the firmware lands on December 18th, including: high-speed electronic shutter up to 1/32,000s, AF area direct selection, Classic Chrome film simulation mode, manual control of shutter and aperture during video capture, Natural Live View that simulates what you’d see through an optical VF, and a bunch more.

You can read the full laundry list of updates and upgrades that 3.0 delivers by clicking here.

xe2_1

On a final note, if you’re using a different X-Series camera, don’t worry… you’ve got some goodies coming your way too.

In the name of giving X-Series camera users “greater longevity of use,” the X-E1, X-E2, and X-Pro1 are being updated with Classic Chrome film simulation, an Interval Timer, enhanced wireless function through Fuji’s smartphone/tablet app, and AF+MF capability that lets you fine tune focus after the AF has done the heavy lifting for you.

Read more about these updates here.

Engineering Photography Beautifully Reveals the Intersection of Science and Art

$
0
0

engineer1

From images of graphene flowers and foam to a portrait of a self-taught engineer fixing one of his elephant pumps that is providing clean water for a village in Malawi, the winning images and other impressive entrants in the University of Cambridge Department of Engineering’s photography competition beautifully illustrate how art, science, and humanity mesh.

Each of the winning entrants are pictured above and below, and in the video below, the photographers responsible talk you through how they captured these works of art:

Several of the images/videos look like something out of a CGI artist’s imagination, but each is a real photograph (sometimes with color added) or video of a process at work.

Blue lights on top of green grass are actually human mesenchymal stem cells attached to fibrin. What might be a thick brush stroke of red paint on a black canvas is actually, “the edge of a Mode II crack; a phenomenon rarely seen in glass.” And machine learning expands van Gogh’s Starry Night far beyond its borders.

Carbon nanotubes made a strong showing in the competition, but we’ve left the descriptions out of the images so that your imagination can try to guess at what you’re looking at below:

engineer2

engineer3

engineer4

engineer5

engineer6

engineer7

engineer8

engineer9

engineer10

engineer11

To see the images in higher resolution, or read the detailed descriptions, head over to the Cambridge Department of Engineering’s Flickr album for the 2014 competition by clicking here.

(via Mashable)


Image credits: Photographs courtesy of the University of Cambridge Department of Engineering.


The Bob Ross of Bug Photography Returns with a Solid Overview of the Macro Workflow

$
0
0

Two years ago we dubbed photographer Thomas Shahan ‘the Bob Ross of bug photography.’ Today, we’re back with a video from the macro master in which he dives into his workflow in the field, dropping bits and pieces of useful knowledge as he goes through a daily shoot.

The video begins with a bit of a preface as to what he’ll be doing, after which Shahan dives into his workflow, explaining the techniques and approaches he uses to capture the fantastic up close and personal portraits of insects that he does.

Screen Shot 2014-11-21 at 2.53.34 PM

In addition to showing his work out in the field, Shahan also gives us a brief glimpse into his post-production workflow, where he insists that ‘less is more’ — we certainly won’t argue with that.

Whether you’re a fan of macro photography or not, Shahan’s voice alone is enough to keep you listening. So click play and remember… happy trees.

Astronaut Chris Hadfield Talks Space Photography and Recreates Some Images with Macro

$
0
0

Astronaut and photographer Chris Hadfield recently paid a visit to the At-Bristol science center in the UK. In the 8-minute video above, Hadfield shares a little about what it’s like to photograph the world from the International Space Station. He also attempts some recreations of his space photos using various objects and a macro camera kit.

The Venus 60mm f/2.8 Ultra Macro is the World’s First 2:1 Magnification Lens with Infinity Focus

$
0
0

venus1

A new Chinese lens manufacturer called Venus Optics has unveiled a new 60mm f/2.8 ultra macro lens that it claims is the world’s first 2:1 magnification lens with infinity focus.

The company’s stated goal is to develop new macro lenses with more than 1:1 magnification that don’t require special extension tubes or teleconverters, since those accessories are too “annoying and time consuming,” the company says.

Venus’ new 60mm lens has a focusing range from 18.5mm to infinity, and has a magnification range of 0.1x to 2x. Photographers can quickly change the ratio without special accessories, making it an ideal lens for “rapidly changing macro photography” environments.

top

A group of macro photographers designed the lens with a wide magnification range specifically for capturing insects of different sizes. If you’re not using the lens for macro, however, it’s still suitable as a standard 60mm lens for everyday photography.

The lens was designed with a strong metal exterior, 9 elements in 7 groups for image sharpness and color rendition, 2 major lens groups to reduce barrel distortion, and a 14-blade close-to-circular aperture for creamy bokeh.

There is one strange thing about the lens though: it’s compatible with both crop sensor and full frame DSLRs, but you can only use it for macro photography if you mount it to a full frame camera. Only APS-C cameras can use it for both macro and everyday photography.

SIDE

The Venus website has a sample gallery with photographs captured using this 60mm lens. Here’s a selection:

QQ图片20140822222314

QQ图片20140826185555

QQ图片20140826190229

QQ图片20140826191208

QQ图片20140918165606

There are also non-macro sample photographs:

IMG_1401

IMG_1765

IMG_1901

And finally, here’s some sample video footage captured through the lens:

You can buy the lens for Canon, Nikon, Sony, and Pentax mounts for $379 over on eBay. The company says it’s also working on a 15mm wide angle macro lens that should be unveiled sometime in 2015.

(via Venus via Photo Rumors)

Macro Photos that Capture the Beauty and Diversity of Insects in Singapore’s Rainforests

$
0
0

15641684648_1790169fbd_z

Nicky Bay is a Singapore-based photographer who captures the beauty and diversity of insects in Singapore’s rainforests through macro photography. He made 46 trips out into the wild in 2014, capturing tens of thousands of photographs and sharing thousands of photos online.

His images are captured using a custom rig and kit of his own making. The main elements are: a Nikon D800, Tamron 90mm f/2.8, Nikkor 200mm f/4, Sigma 15mm f/2.8, extension tubes, a close up filter, 3 Nikon SB-R200 with softboxes and diffusers, and a number of other accessories. Here’s what the rig looks like:

rig

Here are some of Bay’s favorite photographs from 2014:

Cicadae parasite beetle

Cicadae parasite beetle

Net-winged beetle larvae

Net-winged beetle larvae

Leaf mimic grasshopper

Leaf mimic grasshopper

Stink bug hatchlings

Stink bug hatchlings

Fungus gnat larvae

Fungus gnat larvae

Caterpillar

Caterpillar

Ladybird

Ladybird

Long-horned orb weaver

Long-horned orb weaver

15348389448_a97354e4c7_z

Treehopper

Treehopper

Scale Insect

Scale Insect

Planthopper

Planthopper

Masked hunter assassin bug

Masked hunter assassin bug

Dead leaf grasshopper

Dead leaf grasshopper

Spittle bug nymph

Spittle bug nymph

Harvestman

Harvestman

Caterpillar

Caterpillar

Ladybird-mimic spider

Ladybird-mimic spider

Leaf insect nymph

Leaf insect nymph

You can find more of Bay’s work and adventures on his website, Flickr, and Facebook pages.

(via Colossal)


Image credits: Photographs by Nicky Bay and used with permission

Make a DIY Extension Tube to Turn Your Regular Lens Into a Macro Lens

$
0
0

Looking for a simple weekend project that lets you experiment with photography? Makify created this 4-minute step-by-step tutorial on how you can create a DIY extension tube using some plastic piping to capture macro photos using your regular lens.

Extension tubes don’t contain any optical elements and are simply designed to move your lens farther from your camera’s image plane. Unless you get one with electrical contacts for allowing your camera to communicate with the attached lens, it’s essentially a simple tube with mounts on the ends.

Thus, all you need to create a rudimentary extension tube is a plastic pipe (of the correct diameter) and lens/body caps to allow the pipe to attach to lenses and cameras.

extension

You can refer to this online Macro Extension Tube Calculator to figure out how long to cut your tube to fit your needs.

Here are some sample photos captured by Makify using its DIY extension tube:

sample1

sample2

sample3

sample4

DIY Extension Tube [YouTube via DIYPhotography]


Image credits: Video and still frames by Makify

Viewing all 326 articles
Browse latest View live