Quantcast
Channel: macro News, Reviews, and Information | PetaPixel
Viewing all 326 articles
Browse latest View live

Tulips: Shooting a Series of Macro Photos of Mouths

$
0
0

DSC00951web

There is an ineffable allure when it comes the human mouth. The lips and tongue (and much more) help emit wonderful language, tell stories through micro-expressions, and experience the joys of how things in the world taste along with presenting another form of touching.

Here’s a look at how my recent project titled “Tulips” came about.

What I was going through creatively

Recently going through a creative “dry-spell” when it came to my fashion photography, I made the seemingly obvious choice to step back. I wasn’t having fun and I was not feeling excited with even the direction of my ideas. I found myself photographing people without harboring the magic of their spirit. One morning it hit me… this disappointment would only hinder my art. I wanted to feel fresh and silly at something again. I wanted the thrill of uncertainty.

DSC03237

Why a series on mouths?

I think of a kiss. I think of a whisper. I think how lips become the hands of the face. I think about the tiny complexities of the small world, the one we forget exists. I am a reader of people and I often observe through micro-expressions.

Much of my work is very sensual in nature. Some of my work is to appear courageous and heroic. And the last bit of my work is a collection of rare, romantically impulsive ideas that can’t be cloned. I wanted to mix all three into something I have never done.

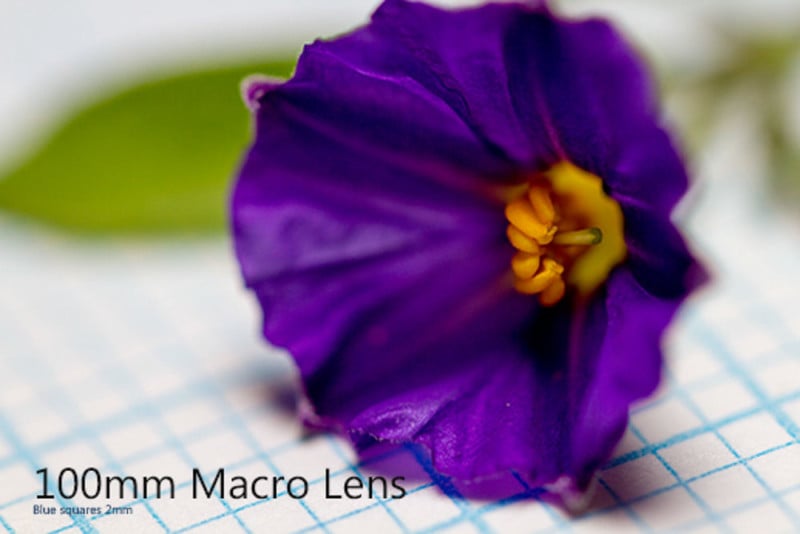
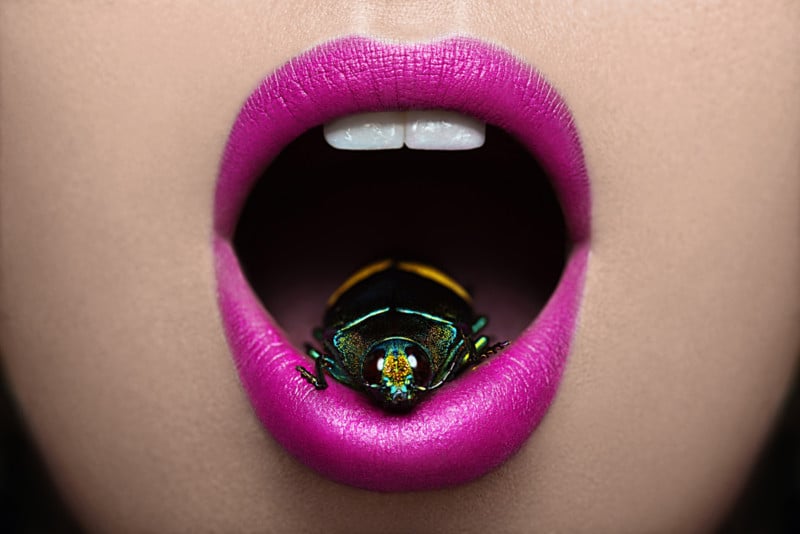
So I thought, you know what… I am going to rent a macro lens and photograph a series on lips. This ended up being something that I will continue throughout my entire career. And it also made me realize that I would much rather have a career of long-running series than have linear stories in editorial form.

DSC00244web

Feeling

I wanted viewers to either feel like something looks super tasty, super interesting, or super intimate. The lips needed to tell a story in everything from their form to their function. There needed to be a sense of fantasy. I am happy if someone loves it, and equally as happy if someone finds something too “left.”

This is the first series where I only cared to make things I like. I pushed myself to make sure what I made was from a blank page and not someone else’s book.

FinalversionHoney

Casting

Casting models was interesting. Nude photography has always been my top passion, so I know how it is more important that comfort is at the highest level than what my idea is. My work is readily available online along with a solid fan base, so it can be quite easier to get the talent I need through the reputation of that alone.

I would require snapshots of lips in good lighting. I would take note of how the skin is around the mouth and whether the lips would need color, gloss, or if I would keep the natural texture. I was also looking for a certain character (like full lips, beautiful shape, etc). For this particular project, personality of the lips was key, and then good skin was the determining factor.

DSC03297

What I asked of the models

There were times I brought items and there were times I didn’t. I asked each model to gather things that they wouldn’t mind tasting for quite a few frames and also what may be personal to their lives. The people in this project were selected very, very carefully. Texture and color were considered greatly.

DSC04242

Lighting

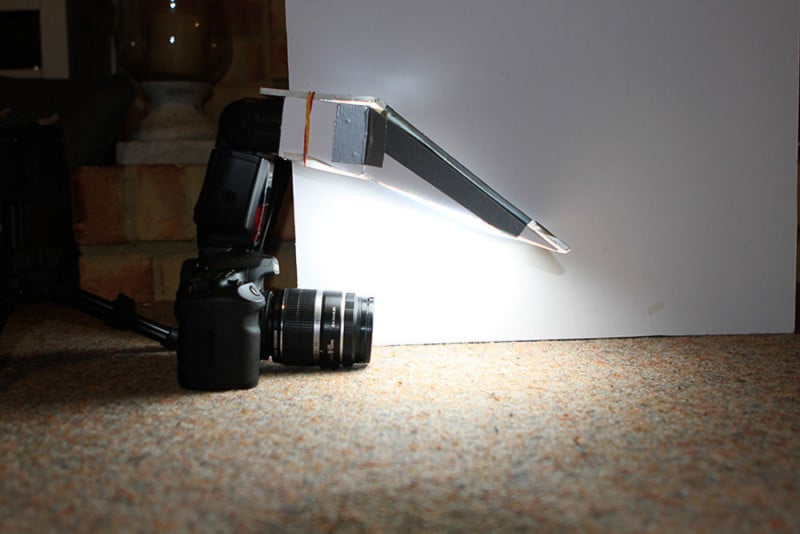
I made this series something that required transportation. Myself, the model, and assistant would generally either be outside under the sun, in the shade with a reflector, or in the house with a speedlight. At the same time I rented the lens, I bought a ticket to see my mother in Maryland. The sun seemed to always be out and the temperature outside was amazing. The other half the the shoots were completed in Miami, where shade was a must.

Processed with VSCO with a5 preset

bts3

Processed with VSCO with m3 preset

Technical

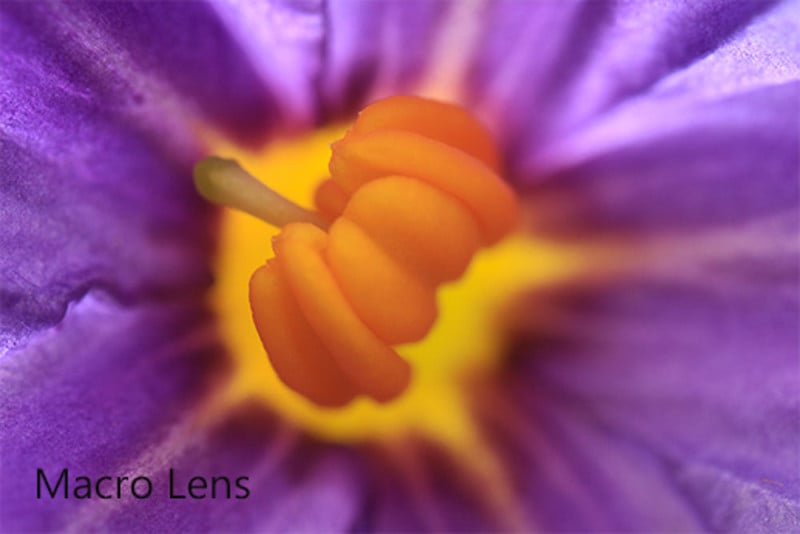
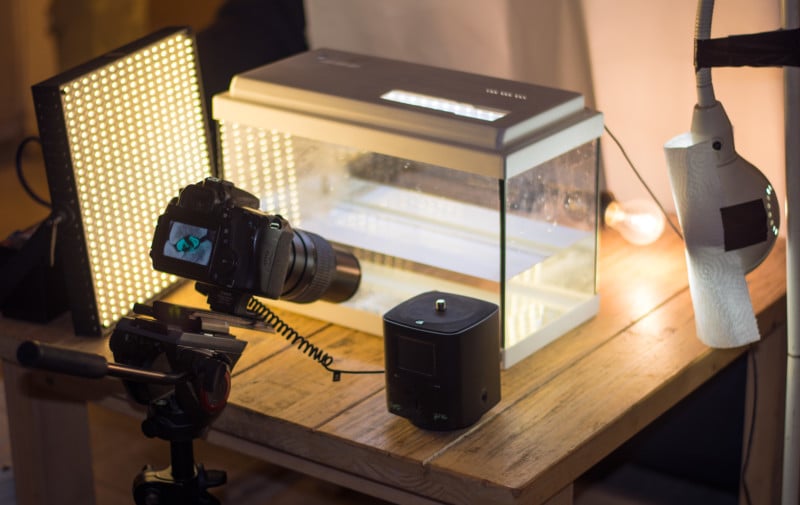
I did all this reading on focus stacking, the thin depth of field pertaining to macro… and I honestly stopped reading. I just wanted to try it. I had a friend come over, shot two ideas and fell in love with the entire concept. I didn’t care to change anything about how things were appearing from the aspect.

Budget: No set amount but as little as possible. Lens rental for 2 1/2 weeks ended up being around $150 USD. I spent no money no gas.

Location: Wherever I was at the time.

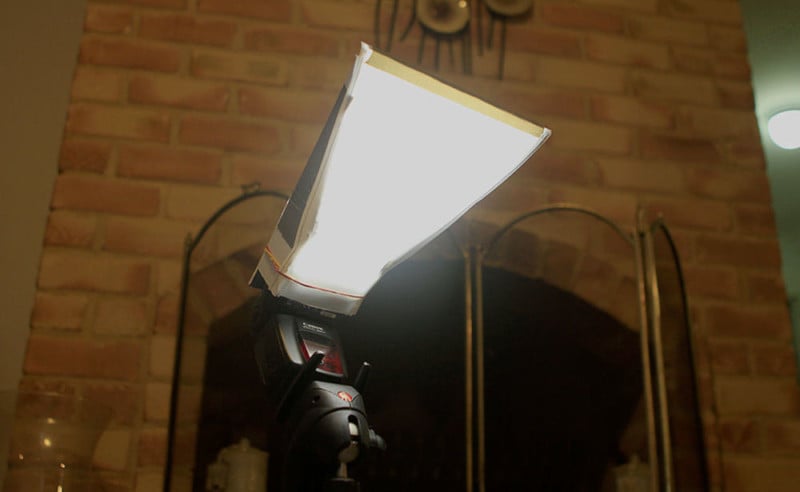
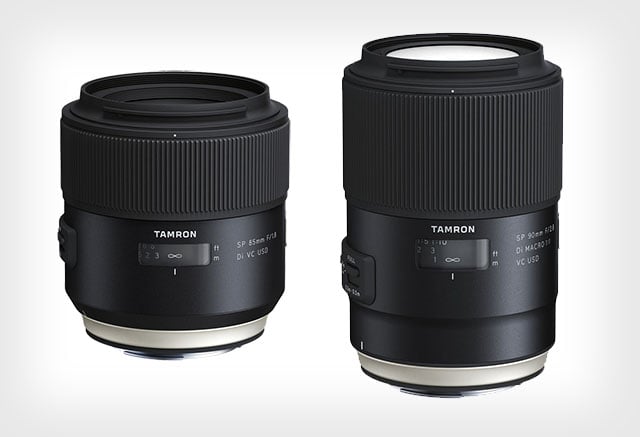
Equipment used: Sony A7 mirrorless camera. A rented lens, Sony’s new FE 90mm f/2.8 Macro G OSS lens. An occassional reflector and cheap speedlight.

DSC03344

DSC04337-2

DSC03981

Conclusion

Being adventurously creative is less about just being different for the sake of it, and more about discovering yourself along with self-reinvention. You’ve already left the mirror enough times pleasing clients, potential publishers, Instagram followers, and your contemporaries. You know you are starting to wind down when everything feels less joyful and your mind is up at 4 a.m. telling you before each shoot that something isn’t fulfilling you.

You don’t need to purchase super expensive equipment, in 2016 it’s easy to rent and afforable as well. You can also just use what you have, including a cell phone, or just borrow from a friend. You don’t need studio time, permits, or even a team of people.

DSC03518

For the “tulips” series, I knew I just wanted some things to excite people without always a logical reason why… Whether through color, concept, or microexpression. If you are going to spend your time living on this collection of cosmic dust and possibilities, you might as well have a good time bringing your most colorful ideas to life.


About the author: Jason Bassett is a photographer based in Miami, Florida. This photos regularly appear in popular magazines, fashion blogs, and advertisements. You can find more of his work on his website, Instagram, and Facebook.


Tamron Launches the World’s First 85mm f/1.8 Lens with Stabilization

$
0
0

tamronlenses

Tamron today announced a new 85mm f/1.8 VC lens, the world’s first fast-aperture telephoto lens with Vibration Compensation (VC), and a 90mm f/2.8 macro lens.

Tamron SP 85mm f/1.8 Di VC USD

tamron85mmlens

The new 85mm f/1.8 VC lens is designed for full frame Canon, Nikon, and (later) Sony DSLR cameras. While the f/1.8 already makes the lens useful in low-light situations, the added stabilization technology further helps to increase sharpness in handheld shots.

There’s a Fluorine Coating on the front element to prevent condensation and resist smudges, and the body features a Moisture-Resistant Construction to keep wetness out. Other features include an electromagnetic diaphragm system for precise diaphragm and aperture control, Ultrasonic Silent Drive (USD) technology for fast and quiet autofocusing, full time Manual Focus override in AF mode, and a 9-blade circular aperture for smooth bokeh.

The Tamron 85mm f/1.8 VC will be available starting in April 2016. Pricing has yet to be announced.

Tamron SP 90mm f/2.8 Di VC USD 1:1 MACRO

90mmlens

Tamron also announced a new 90mm f/2.8 VC macro lens with new XY-Shift compensation, which uses an accelerometer to detect and counteract camera shake, improving stabilization for all focal distances from infinity to macro.

Features include USD for speedy and silent autofocusing, a moisture and dust resistant build, a Fluorine Coating, an internal focusing system so the lens length never changes, a working distance of 139mm (~5.5 in), full-time manual focus override, and a 9-blade circular aperture.

The Tamron 90mm f/2.8 macro lens will be available starting March 2016 for Canon and Nikon mounts, with Sony to follow. It’ll have a price tag of $649.


Update: It has been pointed out that the Zeiss Batis 85mm f/1.8 E-mount lens also has optical image stabilization. It looks like Tamron’s claim has the fine print “Among 85mm F/1.8 interchangeable lenses for full-frame DSLR cameras.” Sony’s lens isn’t for traditional DSLRs, so that explains Tamron’s claim.


Update on 3/21/16: Tamron says the new 85mm f/1.8 will cost $749, and that shipping will begin on March 31st, 2016.

Photos of the Insects in Your Home… in the Style of 17th Century Paintings

$
0
0

portraitshead

Want to see the face of the tiny insects that live in your home? For his project “Suburban Symbiosis: Insectum domesticus,” photographer Daniel Kariko shot close-up portraits of common household insects. The images are gorgeous… and terrifying.

Kariko, an assistant professor of Fine Art Photography at East Carolina University in Greenville, North Carolina, uses tweezers to pose each dead insect before photographing them with a scanning electron microscope and stereoscopic microscope. The two sets of images are combined for each resulting shot.

Under the Table, Back Porch, May 6th  [Kudzu Bug]
Under the Table, Back Porch, May 6th [Kudzu Bug]
Front Porch, Doormat, August 14th  [Dryophthorine Weevil]
Front Porch, Doormat, August 14th [Dryophthorine Weevil]
Kitchen Windowsill, September 14th  [Mosquito]
Kitchen Windowsill, September 14th [Mosquito]
Back Porch Screen Door, August 23rd  [Brown and Black Paper Wasp]
Back Porch Screen Door, August 23rd [Brown and Black Paper Wasp]
Window Screen, August 1st  [Cuckoo Wasp]
Window Screen, August 1st [Cuckoo Wasp]
Wood Stack, Back Patio, October 9th  [Blister Beetle]
Wood Stack, Back Patio, October 9th [Blister Beetle]

Kariko also carefully considers the lighting to create a painterly quality to the shots.

“I carefully arrange the LED lighting, small reflectors, and diffusers, in order to achieve a ‘portrait’-like effect inspired by the tradition of 17th Century Dutch masters,” he says. Each photo takes between 15 to 25 hours to create, Kariko tells CNN.

Inside Hallway Window, May 10th  [Green Lacewing]
Inside Hallway Window, May 10th [Green Lacewing]
Office Hallway, October 22nd  [Unidentified Moth]
Office Hallway, October 22nd [Unidentified Moth]
Bathroom Rug, August 2nd  [Carpet Beetle Larvae]
Bathroom Rug, August 2nd [Carpet Beetle Larvae]

“Insects find way into our homes no matter how vigilant we are in our effort to keep the nature on the outer side of our windowpanes,” writes Kariko. “[These] images are meant to be portraits of our often-overlooked housemates.”

Kitchen Window Screen, July 3rd and July 14th  [Two Weevils]
Kitchen Window Screen, July 3rd and July 14th [Two Weevils]
Back Yard Porch, September 12th  [Red Carpenter Ant II]
Back Yard Porch, September 12th [Red Carpenter Ant II]
Sidewalk Crack, September 24th  [Bee]
Sidewalk Crack, September 24th [Bee]
Front Bathroom Rug, August 4th  [American Cockroach Nymph]
Front Bathroom Rug, August 4th [American Cockroach Nymph]
Apartment Sidewalk, September 8th  [Dragonfly]
Apartment Sidewalk, September 8th [Dragonfly]

Kariko has created over 50 photos for the project so far. You can browse through his gallery over on his personal website.

These Photos Show What a Peacock Feather Looks Like Up Close

$
0
0

Peacock feather, 10x, EPI-LED, HF B (13,10)

Peacock feathers are designed to dazzle and attract a mate, but they’re equally amazing when viewed from up close. Canadian photographer Waldo Nell photographed one through a microscope, and the resulting photos look like colorful abstract art.

Peacock feather, 10x, EPI-LED, HF B (13,10)

Nell shot the photos through an Olympus BX 53 microscope and a Canon Rebel T3i DSLR. Each image is composed of hundreds of photos that were stacked and blended to create single images with higher resolution and greater depth of field.

Peacock feather, 10x, Epi-KL, HF B + C

Peacock feather, 40x, EPI-XC, HF B (16,8)

Nell works as a software engineer, but he’s also an “avid photographer interested in the extraordinary.”

Peacock feather, 4x, Epi-LED, HF B

Peacock feather, 50x/0.5 LMPlan, Epi-LED, HF B (20,10)

Peacock feather, HF B

Peacock feather, 50x/0.5 LMPlan, Epi-LED, HF B (20,1)

Peacock feather, 4x, Epi-LED, HF B

You can find more of Nell’s work on Flickr and on 500px.

(via Waldo Nell via Colossal)


Image credits: Photographs by Waldo Nell and used with permission

DIY: How to Make Your Own Flash Diffuser for Macro Photography

$
0
0

FUF25ROIM0VQHEK.LARGE

When it comes to macro photography, DIY solutions for would-be macro shooters looking to get better results without emptying their wallets abound—from reverse lensing, to DIY macro tubes, to full-blown light boxes. Today, we’ll add to that list by showing you how to make a simple DIY flash diffuser.

This tutorial comes from user Brown_Hash over on Instructables, and it’s both quick and easy. To start, you’ll need to gather: scissors, gaffer tape and clear packing tape, some foam core board, aluminum foil, a sheet of translucent plastic (he used the plastic from a document folder), a ruler, rubber bands, and glue.

blueprint

Once you’ve got your materials, cover one side of the foam core in aluminum foil. This is where the glue comes in, but if you can, buy foam core with an adhesive side. That way you can simply peel the cover off the adhesive side and stick the aluminum directly on there without messing with glue.

Next, follow the blueprint above to cut your diffuser parts out of your aluminum foil-covered foam core (the measurements shown are made based on a Canon 580 EXII so adjust them as needed), and tape together the pieces of your diffuser using gaffers tape on the outside, and clear tape on the aluminum-covered inside.

You’ll end up with something that looks like this:

Gaffer tape on the outside.
Clear tape on the inside.
Taped and folded.
Taped and folded diffuser.

Finally, the last step is to add the actual diffusing material. Cut out a piece of that translucent plastic (in this case, the folder) or paper (e.g. white parchment paper) in the shape of the top of your diffuser, and attach it to the front edge with gaffer’s tape:

FF8ZR5TIM0VQHE7.LARGE

And that’s it! The fully assembled diffuser is attached to your flash using rubber bands. These hold both the frame and the diffusing paper/plastic in place. The final product can be folded flat to carry around in a camera or laptop bag, and looks like this when assembled:

F2MXKY3IM0VQHEC.LARGE

F8EICIOIM0VQHEF.LARGE

And here are a couple of sample images:

FEF2GTJIM0VQHF2.LARGE

FJQPZVMIM0VQHEO.LARGE

To see all the pictures and read the steps in a bit more detail, head over to the Instructables page here. And if you have any suggestions on how this diffuser could be improved or tweaked to make it even better, drop them in the comments.

Macro Photos Capture the Stunning Diversity of Autumn Leaves

$
0
0

leaves_8

Amateur photographer Carola Becker spent last Autumn photographing hundreds of leaves as they turned from green, to gold, to red, to brown. The resulting macro images, placed side by side, show “the beauty of diversity and imperfection.”

We caught up with Carola to ask her about the images, which she first shared here. She explained that the series was born of a childhood love for Autumn, its leaves, and its beautiful colors.

“I collected leaves when I was a child and dried them, but after a few days the colors always got lifeless.” she told PetaPixel over email. “Now, as an adult, I wanted to preserve these fascinating colors and structures through photography.”

leaves_7

Each leaf was shot right where she found them in the forests around her hometown, using a Sigma 50mm Macro lens and available light.

Carola then compiled all of the photos into collages of different sizes. As she zooms in closer and closer, more details emerge; each leaf, each colorful collage, takes on a different characteristic the closer you get.

“My favorite thing in this project is that every leaf itself looks a bit interesting, but all leaves together look much more fascinating then one by itself,” explains Carola. “I had tons of photos. When I got trough all the photos, I thought the project would be very boring. Leaf, leaf, leaf… oh hey, a leaf…”

The collages were her way of adding some much-needed diversity to the images… a story, if you will.

“Eventually, as I compiled the collages from single pictures, I was happy with the result,” says Carola. “It wasn’t that boring anymore.”

Druck

Druck

leaves_3

leaves_4

leaves_5

leaves_6

You can see more from Carola on her website.


Image credits: Photographs by Carola Becker and used with permission.

Photos of Towering Architectural Forms Made of… Chewing Gum

$
0
0

blue_red_v1

When you think “towering architecture photography,” the only chewing gum on your mind is probably the piece you might step on while trying to frame your shot from the sidewalk. But Sam Kaplan‘s architectural homage Unwrapped is actually made of gum.

The photos look like massive architectural forms, towering above the camera, but each is made up of hundreds of sticks of gum unwrapped and stacked by Sam, and held together by super glue.

red_gum_v2_from_sam_v2

Sam wasn’t set on using chewing gum when he first came up with the concept behind this shoot.

“I wanted to find a material that could be both repeatable and remain uniform,” he explains. “I also wanted a high level of malleability and after a lot of trial and error I landed on gum.” What he probably didn’t plan for was having to unwrap several hundred pieces of gum for every. single. photo.

As for the shapes themselves, they’re inspired by futurist and Mayan architecture. “This project was a way to combine both of those to make new forms,” says Sam.

blue_yellow_v1

green_gum_from_sam

gum_arches

gum_cube

gum_palace

You can find a lot more of Sam’s work, including some behind the scenes videos showing how these “structures” were created, over on his Instagram.

(via Colossal)


Image credits: Photographs by Sam Kaplan and used with permission.

A Macro Photography Break: How to Stop and Appreciate the Little Things

$
0
0

1-DbuavYHP5PHmRd4W0ersiw

There’s nothing like a spot of macro photography for making you stop to appreciate nature’s tinier gems.

I have never classed myself as a macro photographer, and as a landscape photographer I’m usually all about the big views and dramatic scenery. But sometimes as a photographer you just have to stop and smell the roses—well in this case crocuses and orchids—along the way!

Spring is the perfect season to experiment with macro photography as meadows burst into life again and woodland floors are transformed with carpets of colour.

Returning from a sunrise shot last year, two fellow photographers and I stopped in Triglav National Park (Slovenia) to try our luck — and lucky we were as we discovered a rare crop of Lady’s Slipper Orchids (Cypripedium calceolus).

Miro lends his t-shirt to provide the perfect makeshift studio backdrop.

Wild Lady’s Slipper Orchids are in decline across Europe, so above all it’s important to tread carefully and preserve them in their habitat. To create a studio-effect shot, we grabbed a reflector and soft box plus some portable portrait lighting that I often carry in the boot of my car and set up a makeshift studio on location.

For the next couple of hours we improvised, playing around with backgrounds and focal lengths (and taking extreme care not to crush any of the delicate flora we were discovering by the second at our feet!) I even convinced Andrej to take off his t-shirt as it was perfect for an improvised background on the fly!

Lady’s Slipper orchid (Nikon D800, Sigma 105mm f2.8 macro, 1/20s, f11, ISO800)

Next stop, the Ljubljana Marshes, a protected landscape park with a wealth of biodiversity. Here we discovered wild crocus in abundance and really had to watch our step as we created a similar set up.

For these shots I used a Sigma 105 mm f/2.8 macro lens.

Andrej photographing crocus, using softboxes. Nikon D300, 17mm, 1/250s, f4, ISO200

So there you have it. No sweeping views, no dramatic weather or spectacular light—just a close-up look at tiny specks of nature’s splendour.

Sometimes it feels good to take a break from what whatever you do in your day-to-day life to take a look at things from a different perspective or an alternative angle.

Wild crocus (Nikon D300, Sigma 105 f2.8 macro, 1/250s, f2.8, ISO200)

About the author: Luka Esenko runs tours and workshops across Slovenia, Croatia and the Adriatic region through Luka Esenko Photography. His latest project is SNAPP Guides, an app to help photographers discover incredible places to photograph. This post was also published here.


Using Reflectance Transformation Imaging to Shoot Ultra-Detailed Macro

$
0
0

rti_feature

In this article I will describe how to construct a simple reflectance transformation imaging (RTI) setup using an Arduino microprocessor and a 3D printer.

It can sometimes be difficult for a single photograph to adequately record and represent all of an object’s important detail. By using RTI photographic techniques, researchers are better able to enhance an object’s individual topography, texture, and color.

Unlike one single photograph, an RTI photographic system may utilize numerous lighting angles to produce sequential images of the same object or artifact that may reveal obscured or hidden detail.


Editor’s Note: This is a very complicated tutorial that is not for the DIY faint of heart, but if you can wrap your mind and skills around it, the results can be extremely cool and useful.


The RTI technique provides a valuable tool for scientists and conservators for the research and preservation of important historical fine art collections. RTI systems are also used in the area of forensic science to photographically record and analyze bullet or projectile striations. Additionally, RTI may be an extremely useful tool for imaging and analyzing pottery fragments, small archaeological tools, and stone artifacts. RTI applications are limitless, and they may provide key visual information for researchers in many investigative areas.

Botanical and zoological fossils also represent ideal subjects for RTI imaging as many of these ancient fossils have intricate shapes, repeating patterns, and interesting surface textures. Ammonite fossils in particular have ribbed, spiral-form shells. Ammonites were free-swimming mollusks found in our oceans, living about the same time as the dinosaurs.

Constructing the RTI System

RTI is a computational photographic method that collects between 40 and 100 images with light sources at different fixed locations. Once the software is able to deduce the location of the light sources, the resulting images can be used to create a mathematical 3D map of the surface.

Software can calculate surface normal vectors from the images. Subsequently, surface features can then be exaggerated to show the exquisite detail. The RTI technique is dependent on taking a number of images with light sources at fixed locations.

The process described in this article outlines a simple device that automatically collects reference images. The software has been developed by a number of researchers and is hosted by Cultural Heritage Imaging. Photographers, researches, and other interested parties are encouraged to read up on the technique. The construction and viewing of the RTI images is done with the RTI builder software maintained by the Cultural Heritage Institute and the resulting RTI file is viewed with their RTI viewer software.

6357_showcase_project_detail_item

The requirement of the light sources for the RTI image set is that they be about 50 in number and placed evenly on a half sphere.

One readily available dome was a simple lighting dome. In order to remove unwanted room light, I spray painted the inside black and then drilled 4 rows of holes evenly spaced from the horizontal. Each row holds 12 individual lights, which brings the total lights to 50 in number. Each hole was numbered to make the wiring easier. The large circular hole at the top of the dome is for the camera and was cut with a Dremel Drill. This technique easily removes the unwanted plastic and makes a smooth cut.

The lights are large 10mm white LEDs, which draw 80mA. These can easily be powered by the 5V DC supplied from the microprocessor. To control each LED, I used an LED light array manufactured by Adafruit Industries, which has the advantage of limiting the number of control wires needed to drive the 50 individual LEDs.

6359_showcase_project_detail_item

The wiring schematic is simple, but the execution is quite time consuming.

It took about 12 hours to cut and solder all the contacts—this was slower than usual due to the Teflon coated wire, which was difficult to strip. Future systems will be assembled with a wire wrap tool, which is preferred for prototyping circuits.

6358_showcase_project_detail_item

The idea for the program is relatively simple too. Initially, an individual light is turned on, the camera shutter is triggered, and then the light turns off. The program sequentially repeats the cycle for all the remaining lights. The duration of the LED light is adjusted in the software.

The prototype is designed for a 105mm macro lens and a Canon 5D Mark III DSLR camera body. In order to image at a low ISO and an adequate depth of field, the lights are programed to stay on for 5 seconds. This allows the full set of images to be collected in about 4 minutes.

The exposure can be optimized for the subject and increased if desired. If a large number of RTI image sets are being collected, the LED on time should be reduced to just slightly longer than the exposure time. To ensure repeatability and exposure efficiency, it is important that the LED illumination continues for the complete duration of the shutter exposure.

The Schematic

Because the Arduino microprocessor does not have 50 outputs to control the lights, the circuit has to use an LED lighting array. To control the array, the microprocessor talks to an LED array driver (board), which in this case is the Adafruit 16×8 LED Matrix Driver Backpack (HT16K33 Breakout).

This board is currently available from Adafruit for about $8.00 USD. The communication protocol for this board is I2C that uses only 2 pins. So you may have up to 8 selectable I2C addresses for a total of 8 matrices, each one controlling 16×8 LEDs for 1024 total LEDs. This matrix driver and the microprocessor are both available at Adafruit Industries.

6364_showcase_project_detail_item

This board is designed to work specifically with the Arduino Uno microprocessor and an array of LED lights.

After stringing long lines from each LED back to the array control, I soon discovered there is a shorter technique in which the LEDS in each row can be connected together on their ground side before returning to the array driver. This simplifies the wiring, but complicates how to visualize the circuit. This wiring set up can be seen as the blue wires on the prototype dome.

The camera is triggered by controlling pin 12 on the microprocessor. When this pin goes to 5 Vdc, the reed switch will trip the camera. The reed switch is used to isolate the camera trigger from any voltages generated by the microprocessor. This is a safety measure to ensure the camera is not exposed to dangerous voltages.

The reed switch is also easy to wire and is very inexpensive. I have not included a schematic of a trigger system of the camera, since most are different.

Creating an RTI File

The resulting image set is converted to JPG image format and run through the RTI builder software.

The software is free to the public and easy-to-follow directions are available in PDF format on the Cultural Heritage Imaging web site. To view the resulting file, the RTI viewer program is used. This program is also available free of charge on the Cultural Heritage Imaging web site.

6363_showcase_project_detail_item

The 3D Dome

The creation of the dome presented a number of problems. To simplify the process and make the design available to researchers, I designed a 3D dome that can be printed in a tabletop 3D printer. The bed size of most 3D printers is limited, so this dome is designed for macro work. The holes are sized to be about the size of a 5mm LED. The holes will change diameter as the RTI dome is scaled for a particular printer. The holes can be considered as pilot holes and can be easily drilled to the desired diameter.

This dome also includes an excess of holes, so that future systems can use sets of LEDs, each operating at a different wavelength.

6356_showcase_project_detail_item

The Code

rti_imaging

Conclusion

I hope that you find this RTI system an easy and elegant technique for collecting images for the RTI process. I would like to thank Andy Kinsman for his help with the design of the 3D dome file.

Download the 3D Dome here, and the Arduino uno code here.


About the author: Ted Kinsman has worked as an optical engineer, a physicist, and a physics instructor before joining RIT to teach the technical side of imaging. Kinsman is currently an Assistant Professor in the school of Photographic arts and sciences (SPAS) where he teaches in the Photographic Sciences Dept. at RIT.

This article was also published here. The original paper can be found here.

Macro Photos Made up of 10K Images Captured with a Microscope Lens

$
0
0

Microsculpture

Levon Biss‘s exhibit Microscuplture is one of the most entrancing macro photography projects we’ve run across. A “unique visual experience,” the series and exhibition is made up of unimaginably detailed macro photographs of insects captured using a microscope lens.

By trade, Biss is a portrait photographer who specializes in capturing world-class athletes; his talent for capturing insects started as a side-project in his home, and featured bugs caught by his own son. But he poured his whole skill as a photographer and light master into those images, and when he showed them to the Oxford University Museum of Natural History, Microsculpture was born and his specimens got a LOT more intricate.

With his pick of the museum’s massive collection of insects, Biss picked some of the most colorful, beautifully textured, and perfectly preserved specimens the museum had on hand and took them home to produce images like these:

Microsculpture

Microsculpture

Microsculpture

The amount of work that went into each of these images boggles the mind. As he explains in the behind the scenes video embedded below, each final image is made up of between 8,000 and 10,000 individual photos, because the depth of field of a microscope lens is so incredibly shallow.

What’s more, each section of the insect must be lit a little differently. The eyes might require one type of lighting, the wings another, and the torso yet another. In all, it takes Biss about 2 weeks to shoot and process together each final image.

He explains this and much more in the BTS video below:

The exhibition will run from May 27th through October 30th of this year in the main court of the Oxford University Museum of Natural History, and each print (some of them 3 meters in size!) will be presented next to the actual specimen to give attendees an idea of the actual scale of what they’re looking at.

But you don’t have to live in the UK or attend the exhibit to see these beauties (although, if you can, we certainly would suggest it). You can see all 22 specimens on the Microsculpture website in beautiful, zoomable, interactive detail by clicking here.

Mr. Biss’ other work can be found on his website.


Image credits: Photographs by Levon Biss and used with permission.

Beautiful Bugs Emerge from Mouths in Macro/Beauty Hybrid Photos

$
0
0

1200 LAMEY_Marc_the beauty is inside _4

It’s not Photoshop. That’s a real bug (not alive… thankfully), and that’s a real model. It’s part of photographer Marc Lamey‘s series “The Beauty is Inside”: a series that combines beauty and macro photography into a strange hybrid photo series that’s somehow captivating.

“I find bugs as beautiful as jewelry,” Marc tells PetaPixel. “We often talk about internal beauty, this was the driving force behind this series.”

Out of a beautiful face emerges a stunning insect—a contrast between the red and pink tones of the lips and skin with the vibrant colors of a perfectly preserved beetle of some sort.

1200 LAMEY_Marc_the beauty is inside _3

“I know a few models that are always game to try my crazy ideas, but I was worried I wouldn’t find enough to create this series,” he explained to us over email. “But it ended up being surprisingly easy. After the first few examples were shot, I was getting requests from models to be part of the project.”

“The fear was not there,” he continued, “even if putting a bug with hair, stingers, and taste of taxidermy in one’s mouth was at times a challenge.”

The final project is an “intermediate of macro photography and beauty photography” captured the way Marc would do a beauty shoot. For him, there’s no better way to capture the fact that “Beauty is Inside.”

1200 LAMEY_Marc_the beauty is inside _1

1200 LAMEY_Marc_the beauty is inside _2

1200 LAMEY_Marc_the beauty is inside _5

1200 LAMEY_Marc_the beauty is inside _6

1200 LAMEY_Marc_the beauty is inside _7

1200 LAMEY_Marc_the beauty is inside _8

1200 LAMEY_Marc_the beauty is inside _9

1200 LAMEY_Marc_the beauty is inside _10

You can find more of Marc’s work on his website and Facebook.


Image credits: Photos by Marc Lamey and used with permission.

Canon Unveils EF-M 28mm f/3.5 STM Macro Lens with Built-In Ring Light

$
0
0

4865069039

After leaked photos of Canon’s first EF-M macro lens appeared online yesterday, we told you to “stay tuned” because we’d likely see an official announcement before long. Less than 24 hours later, we have the official announcement!

Say hello to the EF-M 28mm f/3.5 STM macro lens with built-in “Micro Lites.”

The 45mm equivalent lens is the first macro lens for the Canon mirrorless M system. It features Hybrid IS that offers a reported 3.5 stops of stabilization, true 1:1 reproduction (with the option to use a special 1.2x Super Macro Mode), a stepping motor for smooth, near-silent autofocus, and a “tapered” lens top to prevent casting shadows at close range.

Those specs aren’t what makes this lens stand out, though. The EF-M 28mm f/3.5’s claim to fame are the two built-in “miniature Macro Lite electronic flash units” on the front of the lens. These will help you light your tiny subject, freeze motion, improve color accuracy, and provide “a better sense of depth and dimension.” The Macro Lites can be fired off individually or both at once to control flash output, and each also includes a “bright” and “dim” setting for brightness control.

Here are a few more pictures and a video of the new lens in action:

4132044385

1821025299

1540596699

7316138931

Announced earlier today, the EF-M 28mm f/3.5 macro is already available for pre-order for a reasonably affordable $300, and is slated to ship in June.

flash-speedlite-600ex-ii-rt-3q-hiRes

flash-speedlite-600ex-ii-rt-back-hiRes

flash-speedlite-600ex-ii-rt-back-master-hiRes

In addition to the EF-M macro lens, Canon also announced a new Speedlite 600EX II-RT flash (above) that improves recycle time by “approximately 1.1 to 1.5 times” when using AA batteries, and “up to 2 times” if you’re using Canon’s optional Compact Battery Pack CP-E4N.

It’s compatible with most EOS cameras, and will also be available in June for $580. You can already pre-order the 600EX II-RT flash here.

BLIPS: Tiny, Powerful Smartphone Macro Lenses that Fit in Your Wallet

$
0
0

blips_featu

Adding macro capabilities to your smartphone camera usually involves a DIY hack like this one, but if you’re looking for more professional results then you should definitely check out the BLIPS micro & macro lenses.

Just posted to Kickstarter a few days ago, BLIPS is an ultra portable set of 2 mini lenses engineered specifically for smartphone use in mind—in fact, they’re calling them “the world’s thinnest set of microscope lenses for smartphones and tablets.”

Thanks to their design they can be attached to any smartphone over and over again, and their little ‘carrying case’ is small enough to slide right into your wallet. Check out the Kickstarter video below to see what we’re talking about:

The set is made up of the BLIPS Macro and BLIPS Micro lenses:

The BLIPS Macro lens is only 0.5mm thin, but offers optical magnification of about 10x. Its working distance is about 1/2-inch (12mm) and it works a lot like adding a laser pointer lens to your smartphone, only at much higher quality.

Photo taken without (left) and with (right) the BLIPS Macro lens.
Human eye captured with BLIPS Macro.

The Micro lens is meant for scientific use, and offers much higher magnification, letting you “use your smartphone as a real microscope in seconds.” As they explain it on the Kickstarter:

Blips Micro is able to detect details of about 1/7000 inch (≈1/300 mm), distinguishing single cells or other inhabitants of the micro-world. [It] is less than 1/20 inch (~1.2mm) thick, and turns your phone into an actual digital microscope. You need to keep a distance of ¼ inch (6mm) between the lens and the sample under observation to discover tiny details at a high definition. With the use of the digital zoom it’s possible to achieve magnification of over 100x.

BLIPS Micro before and after.

13131042_1047416168662984_4314498282520402068_o

Obviously the amount of magnification you get depends on your phone’s capabilities, but these are undeniably powerful. Plus, they’re affordable.

The Basic Kit—which includes both lenses in a thin, credit card-sized carrying case—will cost you only $23. The Lab Kit—which includes a selection of pre-prepared microscope slides and a stage with light source for viewing those slides—is only $46. You can get both together for $57.

All the early bird deals are sadly gone and the BLIPS lenses are already overfunded, but getting your BLIPS kit through Kickstarter is still the best way to go. To find out more about these lenses or put down a pledge of your own, head over to Kickstarter.

Cheap, Light, and Slim: Shooting Macro with a Pancake Lens

$
0
0

Beetle-1024x683

A few weeks ago, I traveled to the Central Valley of Costa Rica for a professional development opportunity through work. While my week in Central America was focused on improving leadership skills and cultural intelligence, I was stoked for the little free time I had for dedicated bug photography.

Packing light as a photographer who wants to be prepared for every possible photographic scenario is tough. I purchased a large camera backpack specifically for this trip and anticipated bringing a variety of lenses and macro equipment including one of two macro lenses (Canon EF 100mm f/2.8 macro lens or Canon EF 180mm f/3.5L macro lens), an old 28mm manual lens for reverse macro work, a Canon EF-S 10-22mm f/3.5-4.5 wide angle lens for the few landscapes I hoped to shoot, and my handy Canon EF-S 24mm f/2.8 pancake lens (which quickly became my favorite all-purpose lens). I also considered bringing my Canon MT-24EX Macro Twin Lite Flash and one or two Extension tubes.

While this may not seem like a lot of equipment for a photographic expedition, it was certainly too much to lug around for a professional development opportunity that had us visiting small farms and community organizations. In the days leading up to my trip, I decided to do something crazy: I decided to pack the least amount of photography equipment possible that would allow both macro work and general shooting.

I packed my 24mm pancake lens with a 12mm extension tube and a Graslon Spark flash diffuser for good measure (I ended up throwing in my 10-22mm wide angle lens at the last minute, with which I shot exactly two photos). All my photo equipment fit in the bottom of a small backpack under my other travel necessities (jacket, poncho, bug spray, sunscreen, etc.).

I had tried shooting before with the pancake lens setup and I was never particularly pleased with the results. Leaving my macro lenses behind caused a lot of anxiety before the trip, but I’m happy to report that my rash decision to leave my tried and trusted equipment behind in favor of a smaller and lighter setup paid off.

Leafhopper-1024x683

Grasshopper-1024x683

The Canon EF-S 24mm pancake is specifically designed to work with Canon APS-C cameras (cropped frame) and boasts an extraordinarily slim profile of less than one inch. The minimum focal distance is 0.5 ft, but paired with the 12mm extension tube, the minimum focal distance of this setup becomes less than 4 inches (for 1:1.4 magnification).

It’s worth mentioning that you lose infinity focus when using an extension tube, so you’re pretty much stuck with a macro setup unless you take the extension tube off the lens (which is quick and easy).

Jumping-Spider-1024x683

Caterpillar1-1024x683

An added benefit of my pancake macro setup was the cost.

Traveling with camera equipment is not without risk. Had something happened to my lens or extension tube, I would have been out just over $200 (as opposed to the $1600 + $900 I spent on my Canon EF 180mm f/3.5L macro lens and Canon MT-24EX Macro Twin Lite Flash respectively).

Add about $40 if you like the idea of a flash diffuser to reduce harsh hotspots on shiny bugs. Using the camera’s built-in flash with a diffuser resulted in sharp handheld shots.

Ant-1024x683

Bug-1024x683

In the end, I captured some great insect and spider shots in Costa Rica without the hassle of carrying around a lot of expensive equipment. The setup was extremely lightweight and fit comfortably in my small backpack for easy transport, and by always having my 24mm pancake lens, I felt prepared for most situations—from group shots to landscapes.

If you’re looking for a versatile and inexpensive macro setup, a pancake lens with an extension tube may be worth looking into!


About the author: Danae Wolfe is a macro nature photographer residing in NE Ohio. Her primary artistic interests include shooting candid insect & botanical portraits. You can find more of her work on her website, blog, and Facebook page. This post was also published here.

These Beautiful Photos Highlight the Incredible Diversity of Bees

$
0
0
Metallic Green Bee (Augochloropsis metallica) collecting nectar and pollen from a Black-eyed Susan (Rudbecki fulgia), South Carolina, USA
Metallic Green Bee (Augochloropsis metallica)

It’s safe to say natural history photographer Clay Bolt is obsessed with North American bees. What began with a few photos in his backyard in South Carolina back in 2014 has turned into a full blown project aimed at helping document the staggering diversity of North American bees.

After accidentally photographing two different species of North American bee in his own backyard, Clay began doing some research and learned that there are over 4,000 native bee species in North America. “As I began to do more research, I realized that so little was known about our native species, and so at that moment I realized that I could use my photography to begin to tell some of those stories,” he tells Slate.

And that’s exactly what he’s done, documenting the beauty and diversity of North American bees for his project titled “Beautiful Bees.” Below is just a small selection of the many many (many many) photos Clay has captured out in the field:

Bombus sandersoni, Sanderson's Bumble Bee, visiting Azalea, Highlands, North Carolina
Bombus sandersoni, Sanderson’s Bumble Bee
A mason bee, Chelostoma philadelphi, male, is captured by an ambush bug (Phymata sp) that lies hidden in a mock orange (Philadelphus sp) blossom. Chelostoma philadelphi is a bee that prefers mock orange flowers for foraging.
A mason bee, (Chelostoma philadelphi), male, is captured by an ambush bug (Phymata sp) that lies hidden in a mock orange (Philadelphus sp) blossom.
A Cuckoo Bee (Holcopasites calliopsidis) is dwarfed beside a US dime.
A Cuckoo Bee (Holcopasites calliopsidis).
A Halictus Sweat Bee (Halictus poeyi) prepares to land on an Aster next to a Metallic Green Bee (Agapostemon splendens), South Carolina.
A Halictus Sweat Bee (Halictus poeyi) prepares to land on an Aster next to a Metallic Green Bee (Agapostemon splendens).
Hunts Bumble Bee (Bombus huntii), pollinating a sunflower in a community garden, Bozeman, Montana.
Hunts Bumble Bee (Bombus huntii).
Rusty-patched Bumble Bee (Bombus affinis), Madison, worker, Wisconsin
Rusty-patched Bumble Bee (Bombus affinis)
Yelllowheaded bumble bee (Bombus flavifrons), Fairy Lake, Bozeman Montana
Yelllowheaded bumble bee (Bombus flavifrons)
A Black-tailed bumble bee, (Bombus melanopygus) flies in front of the Golden Gate Bridge.
A Black-tailed bumble bee, (Bombus melanopygus)
Metallic Green Bee (Augochlorella sp) on Bee Balm (Monarda didyma).
Metallic Green Bee (Augochlorella sp).

None of these bees were sedated in order to capture their picture; Clay will stand still in front of a flower for as long as it takes to get the shot he’s looking for. He’s able to put that kind of dedication into his work, in part, because he hopes his photos can help save the species of bee that are facing extinction.

“1 in 4 species of North American bumble bees are at risk of extinction,” he told us over email. “One species, Bombus franklini, Frankllin’s bumble bee, is most likely already extinct and almost no one even realizes this, or knows about the species.”

Armed with this knowledge, Clay has set out to try and get the related rusty-patched bumble bee species protected under the Endangered Species Act. Once one of the most common bumble bees in North America, they’ve all but disappeared over the past 15 years.

Together with Day’s Edge Productions, Clay has produced a film due out in June telling of the rusty-patched bee’s plight. You can see the trailer below:

To learn more about Clay’s bee work or see more of his photos, head over to the Beautiful Bees website. And if you want to see more of Clay’s photography, you can find it on his personal website, Facebook, and Instagram.

(via Slate)


Image credits: All photos by Clay Bolt and used with permission.


Magical Wardrobe Photo Created with Handmade Miniatures On-Location

$
0
0

bts 1

Felix Hernandez‘s photographs are other-worldly. Using intricate miniatures and macro photography techniques, he takes his dreams and translates them into reality through the camera. His latest project, The Wardrobe, is no exception.

Like much of Hernandez’s work, The Wardrobe was inspired by his dreams. “Our dreams act like a blender of ideas, fears and desires with a touch of who we truly are,” he writes. “‘The Wardrobe’ is one of those images that appears repeatedly in my dreams. Repeatedly enough to get attention, making me want to take it out and bring it to life.”

And so… he did. Like all of his images, it was shot using miniatures, but photographed in such a way that it looks larger than life.

The Wardrobe

What’s special about The Wardrobe isn’t necessarily the miniature-scene-looking-real aspect, Hernandez does that with all of his photos. What’s special, at least to him, is that all of the effects in The Wardrobe were created in-camera, not in post.

“For this project I wanted to go as ‘natural’ or ‘unplugged’ as possible,” he explains. “Finding new ways to create an image and not depending so much on the post-production.”

bts 2

bts3

bts4

He admits he DID combine several images to create the final photograph you see above, but the effects were created in-camera.

“If I needed a cloudy background, instead of doing a composite, I went on location. If I needed fog, I used dry ice. If I needed an ancient ruin, I built it myself, and so on,” he writes on his website. “Soon I found myself doing things that I had forgotten or that I would never think I could be able to do, and of course, by doing them, it opened a new door for me… a new door full of new possibilities for creation.”

You can see his entire process from start to finish in the video below. The level of attention to detail and the sheer amount of creativity simply blew us away:

To see more of Felix’s work, check out this article he wrote or us back in March, and then go visit his website or follow him on Facebook, YouTube, and 500px.

These Macro Photos of Colorful Insects Look Like Masked Faces

$
0
0

goet_feature

Fine Art photographer Pascal Goet has been capturing macro photos for 26 years, but it’s only today that his work made its way onto our radar. His series Mask & Totem features some of the most colorful, anthropomorphic insects he’s photographed—insects that looks like mysterious, intricate masks.

Some of the “faces” are easier to see than others, but each begins to look like an alien or animal figure the longer you stare at it, especially if you attend one of Goet’s exhibitions and see the images printed large.

Pascal—who is represented by the Blin plus Blin Gallery in Paris—doesn’t alter the colors of the insects at all. A little bit of work with light and shadow is all these insects get in post.

See them for yourself below:

PascalGoet_3

PascalGoet_2

PascalGoet_5

PascalGoet_6

PascalGoet_1

PascalGoet_4

PascalGoet_8

These images are currently on display in Albi, France until mid-August and will travel next to the Museum of Natural History of La Rochelle, France where you can see them up close from September 20th to January 15th. If you’re in either area, we definitely suggest dropping in.

To see more of Goet’s work, head over to his website.

(via Colossal)


Image credits: All photographs by Pascal Goet and used with permission.

Eerily Beautiful Macro Timelapse of Different Pills Dissolving in Water

$
0
0

Amazing photography subjects are everywhere, and if you don’t believe us, look no further than this gorgeous macro photography timelapse of pain killers, vitamins, and other over-the-counter pills dissolving in water.

The timelapse was created by 27-year-old Tel-Aviv-based photographer Ben Ouaniche, who has started an entire YouTube channel called The Macro Room dedicated to this kind of content.

“I love macro photography, timelapses and anything that combines creativity and complex technical tools to create unique frames that aren’t possible to be seen with the naked eye,” Ben tells PetaPixel. “In this video I used macro lenses, moving timelapse controller and a variety of homemade tools to expose the beauty behind the process of dissolving pills.”

His setup wasn’t anything out-of-this-world intricate or complicated.

“I used 2 macro lenses, Canon MP-E 65 for the closest range shots, Canon 100mm L for the medium range, and Canon 50mm 1.4 for the surrounding shots,” explains Ben. “In some shots I also used the Genie timelapse controller to spin the base of the pills tank while the camera stood still, this technique adds real motion and reveals a deeper view of the scene.”

DSC_6475

DSC_6554

Don’t let the “simple” setup fool you though, this took just as much patience as any other timelapse endeavor. Ben tells us that most of the shots took over 10 hours of timelapse recording and caused “a steep learning curve” for him.

“In some cases I had to gradually heat the water after a period of time to fully dissolve the pills without interfering with the first thin layer,” he says, describing one of the challenges he faced. “The timelapse movement, light changes and the very sensitive macro environment were only a few of the factors that made this project very time consuming and challenged me to find creative solutions.”

In the end, though, it was all worth it. The movement from the Genie controller helps give the timelapse more umph, and some of the dissolving pills are truly mesmerizing… when you don’t have to wait 10 hours to watch them dissolve, of course.

DSC_6600

DSC_6604

As we mentioned above, this video is part of Ben’s macro YouTube channel called The Macro Room, so if you want to see more, definitely head over and subscribe. There are only two videos on there right now, but given the quality of the first two, we can’t wait to see what Ben comes up with next!


Image credits: All photographs by Ben Ouaniche and used with permission.

These Macro Photos Were Taken with a Smartphone and Compact Cam Lens

$
0
0

20160625_000136

Capturing beautiful macro photos on the cheap isn’t tough if you’re willing to experiment a little bit. Amateur photographer Benjamin Weir was able to do it with just a smartphone and a lens element he tore out of a dead point-and-shoot camera.

That’s how Weir captured all of the photos in this post. Inspired by a magnifying glass sitting in his house, he decided to cannibalize some lens elements from his mom’s defunct compact camera. All it took was finding the right lens element and sticking it on top of his LG G3 with a little bit of tack.

Here are the results:

20151009_122916

20150506_110956

20151014_175916

20150506_110832

20160609_165306

20150506_110843

20160609_165426

It’s not the be-all end-all of macro photography of course, but it’s a fun hack and it definitely beats the usual laser pointer lens or water droplet hack when it comes to quality. These photos were taken with an LG G3 but Weir told us his cousin tried it on his new iPhone and got even better results.

To see more of the photos he shot with this hack, or any of Weir’s other photography, be sure to give him a follow on Instagram or check out his Flickr account.

(via The Phoblographer)


Image credits: All photographs by Benjamin Weir and used with permission.

Pro Watch Photos Shot with an iPhone and a Jeweler’s Loupe

$
0
0

iPhone_Speedmaster-SET_UP-WEB-4

“It’s not the camera, it’s the photographer.” We (and probably you) hear this particular phrase ad nauseam, but once in a while we run across a set of photos that say the same thing without having to utter a word. These gorgeous watch photos definitely qualify.

The images were captured by professional Chicago-based photographer Nick Ulivieri. Nick mostly shoots architecture—properties and cityscapes—but he recently experimented with a totally different style of photography: professional watch product photos.

The photo shoot came about after Ulivieri ponied up for an Omega Speedmaster, the watch of his dreams.

“Quite a while back I was visiting the Adler Planetarium and noticed a watch on display. It was the Omega Speedmaster worn by Jim Lovell on his Gemini XII mission,” he tells PetaPixel. “I thought it was such a cool artifact. The Moonwatch—as it’s affectionately called—was the only chronograph that survived NASA’s stringent testing procedures and the only timepiece NASA certified for manned space flight.”

iPhone_Speedmaster-WEB-6

It was a watch Ulivieri thought about for many years until, finally, he got one. So what’s a professional photographer to do when he finally gets something he’s been wanting for years? He set about photographing it of course!

Ulivieri grabbed his iPhone 6s, sticky-puttied the jeweler’s loupe from the Speedmaster box onto the phone, and set up an impromptu product shoot.

“The shoot started out as a test, really,” he explains. “The Speedmaster comes in this really elaborate case and one of the included tools is a jeweler’s loupe. While examining the watch through the loupe, I thought to put it in front of my iPhone camera.”

The setup was simple: the loupe was poster puttied onto the iPhone, and the iPhone mounted atop a recently purchased Platypod.

iPhone_Speedmaster-SET_UP-WEB-2

iPhone_Speedmaster-SET_UP-WEB-1

iPhone_Speedmaster-SET_UP-WEB-5

iPhone_Speedmaster-SET_UP-WEB-6

Using his computer and the windows for light, he set about capturing some macro photos. Then, for some variety, he took the black cardboard sleeve that housed the watch’s case and used it as a “dark cubby.”

“The open front allowed me to shoot into it,” says Nick. “While the open back allowed just enough of my computer screen’s light to leak in and add nice highlight to the domed crystal.” Here are the final shots. Pretty impressive for a homebrew setup using an iPhone, a jewler’s loupe that came with the watch, and some card stock:

iPhone_Speedmaster-WEB-1

iPhone_Speedmaster-WEB-2

iPhone_Speedmaster-WEB-3

iPhone_Speedmaster-WEB-4

iPhone_Speedmaster-WEB-5

iPhone_Speedmaster-WEB-8

iPhone_Speedmaster-WEB-9

iPhone_Speedmaster-WEB-11

Before he packed up, Nick had one more idea he wanted to try. “I was really happy with all the photos I created, but started kicking myself for not trying to focus stack at least one angle,” he told us. “I have’t done much close-up macro product work like this, let alone focus-stack, but I knew focus-stacking was the only way to get full-depth focus so I felt like I still had something to prove.”

Unsure how to go about creating the focus stack, he looked up a tutorial on none other than PetaPixel itself!

“I pulled out the black sleeve, set-up the platypod, and wiped down and dusted the watch. Once my lighting was set (mainly using index card sized black flags to block the ambient light behind me) I simply started tapping my phone to focus on various parts of the watch to ensure I had enough frames for the full-depth shot,” he says. “In the end I took about 6 batches worth of images. The best batch, which went into the final stack (below) is comprised of thirteen individual iPhone frames.”

Here’s the result:

**iPhone_Speedmaster-STACK-WEB-1

It’s not the camera, it’s the photographer. Make a face or roll your eyes if you must, but we love it when the photos make this point for us. To see more of Nick’s work—most of it isn’t shot on an iPhone—head over to his website or give him a follow on Facebook, Twitter, and Instagram.


Image credits: All photos by Nick Ulivieri and used with permission.

Viewing all 326 articles
Browse latest View live